To begin with, letâ€ s assume a couple things.
- We have a Windows 2012 R2 member server with Azure AD Connect (AAD Connect) version 1.1.105.00 (or newer) and the Azure AD Module for PowerShell installed; and
- We have an Exchange 2013 CU11 (or newer) server configured for hybrid with an active O365 tenant.
Now that weâ€ve established a baseline, there are a couple of options to perform the task of provisioning an AD user, creating a mailbox, and assigning an Office 365 license.
- The first option would be to create an AD user, create an on premise mailbox, migrate the mailbox to Office 365, and assign a license; or
- The second option would be to create an AD user, create a remote (or Office 365) mailbox, and assign a license.
In this post, I will cover the second option simply because it includes fewer steps and attempts to avoid confusion around where the mailbox should be created.
[su_note note_color=”#ee899a”]Do not create an AD user and then go to the Office 365 portal to create a new user and associated mailbox. This method will not properly create a synchronized O365 user and mailbox.[/su_note]
STEP 1: CREATE USERÂ & MAILBOX
From the Exchange server, first create the AD user with remote mailbox using one command via Exchange Management Shell (EMS or Exchange PowerShell)…
New-RemoteMailbox -UserPrincipalName "[email protected]" -Alias "UserTest" -Name "UserTest" -FirstName "User" -LastName "Test" -DisplayName "User Test" -OnPremisesOrganizationalUnit "Office 365 Users" -Password (ConvertTo-SecureString "EnterPasswordHere" -AsPlainText -Force) -ResetPasswordOnNextLogon $true
In the command above, I created the AD user in an OU named “Office 365 Usersâ€, set the password to “EnterPasswordHereâ€, and will require the user to change their password at next logon. However, I did not assign an SMTP address or remote routing address assuming that the email address policies are configured to be applied as new mailboxes are created.
STEP 2: SYNCHRONIZE USER
Once the AD user and mailbox are created, the AD object must to be synchronized to O365 in order to add the user with associated mailbox in the tenant. With the new version of AAD Connect, the scheduled sync time occurs every 30 minutes. In my case, Iâ€m not that patient and will manually force a sync to O365.
From the server with AAD Connect installed, via an elevated PowerShell console, run the following command to perform the sync to O365…
Start-ADSyncSyncCycle -PolicyType Delta
This task will synchronize all changes made to AD since the user and mailbox were created.
STEP 3: ASSIGN LICENSE
In the final step, I assign an O365 license to the newly created and synchronized user. The following commands can be run from any machine that has both Microsoft Online Services Sign-in Assistant for IT Professionals RTW and Windows Azure Active Directory Module for Windows PowerShell installed. In my case, they are installed on each server, as well as my admin workstation.
Connect to O365 via PowerShell from an elevated PowerShell console; or using Azure AD Module for PowerShell console.
Confirm the new user does not have an O365 license assigned.
#Connect to Office365
Import-Module MSOnline
Connect-MsolService
$O365Cred = Get-Credential
$O365Session = New-PSSession –ConfigurationName Microsoft.Exchange -ConnectionUri https://ps.outlook.com/powershell -Credential $O365Cred -Authentication Basic -AllowRedirection
Import-PSSession $O365Session

Get-MsolUser -UnlicensedUsersOnly
This command returns unlicensed O365 users in which the “isLicensed†parameter is “Falseâ€.
The next command returns the “AccountSkuId“, or subscription license(s), of my tenant that I will use to assign to the new user.
Get-MsolAccountSku
The AccountSkuId will look something similar to “tenantname:ENTERPRISEPACK“; where “ENTERPRISEPACK†represents my Office 365 Enterprise E3 subscription. Other subscriptions will have different representations.
Before I can assign any licenses to my new user, the user must be assigned a location (or country code). Since Iâ€m am located in the United States, I use “US†as the two letter country code for the user, using this command…
Set-MsolUser -UserPrincipalName [email protected] -UsageLocation US
Now that Iâ€ve set a location for the new user, I can assign a license from my associated O365 subscription, using this command…
Set-MsolUserLicense -UserPrincipalName [email protected] -AddLicenses tenantname:ENTERPRISEPACK
Finally, the user can access their assigned mailbox in Exchange Online.
]]>So used the formula below and was able to find all addresses that were “FALSE”. I filtered them out and was able to fix them as needed.
Here’s what you need to do:
If your e-mails are in A column, go in the B column and in the B1 cell and copy paste this code:
=AND(FIND("@";B2);FIND(".";B2);ISERROR(FIND(" ";B2)))
Then, go down and left on the B1 cell so you can copy and paste the code to the other cells. Â For all the valid e-mails, it will give you ‘TRUE’ and for the invalid ‘FALSE’.
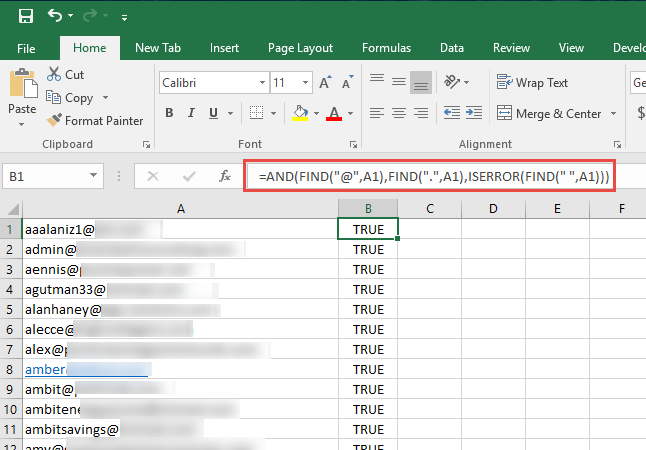
This is what I had to do.
On the non working server:
- Create a Folder on C: called MailsExport
- Open Exchange Management Shell and type the following:
$array = @(Get-Message -Queue "QueueName" -ResultSize unlimited)
$array | ForEach-Object {$i++;Export-Message $_.Identity | AssembleMessage -Path ("c:\MailsExport\"+ $i +".eml")}
- Mail should start exporting.
- Once completed Move the *.eml files to the “Exchange Server\V14\TransportRoles\Pickup” folder on the working server.
- The new server should immediately start processing the messages.
Error: The subscription for the migration user [email protected] couldn’t be loaded. The following error was encountered: A subscription wasn’t found for this user.
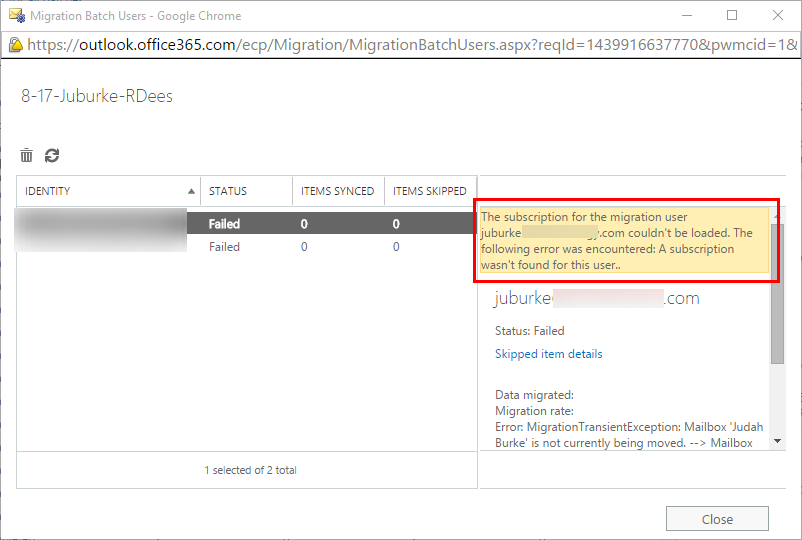
In short, there is an address conflict between the user properties of the exchange server and the synced object on Office365. Lets go back to the basics to get this fixed.
Environment: Exchange 2010 in Hybrid Mode with Exchange Online. Migrating accounts using a staged migration approach. The problematic user in Exchange Online is properly licensed.
Setup for Staged Migration.
- Exchange Online: Stop the problematic migration batch and delete it
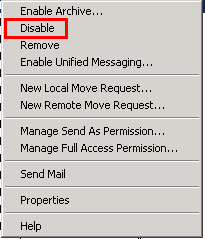
- Exchange 2010: Even though the user account may show that it is a Remote mailbox or just a User Mailbox. Right click and hit Disable. (This will remove the exchange properties for the user.)
- Â

- Exchange 2010: Search your Exchange database and find the user’s on-premise mailbox. This is easier if you have just 1 or 2 databases. In an enterprise environment this may be a task by itself. Open EMS and type the following:
Get-MailboxStatistics -Database <your exchange database name>
If the result set it too long, you may want to save the contents to a file.
Get-MailboxStatistics -Database yourexchangedatabase > C:\my_exchange_users.txt
Open the file and search for the user you disabled in step 2
- Now you need to delete the problematic user in Exchange Online. Open up PowerShell ISE and type the following:
Import-Module MSOnline
$O365Cred = Get-Credential
$O365Session = New-PSSession –ConfigurationName Microsoft.Exchange -ConnectionUri https://ps.outlook.com/powershell -Credential $O365Cred -Authentication Basic -AllowRedirection
Import-PSSession $O365Session
Connect-MsolService –Credential $O365Cred
After supplying the Global Admin credentials and successfully logging in, do the following:
Remove-MsolUser -UserPrincipalName [email protected]
Remove-MsolUser -UserPrincipalName [email protected] -RemoveFromRecycleBin
- Now the object is not in Exchange 2010 and Exchange Online
- Attach the user back to Exchange 2010. Open up EMS and type the following:
Connect-Mailbox -Identity "John Doe" -Database "YourExchangeDatabase" -User "John Doe"
- The mailbox should show up in Exchange 2010. Make sure that the SMTP address includes: [email protected] address.
- In a  few minutes DirSync will sync the object back to Exchange Online (This depends on your DirSync time interval)
- When the user shows up – make sure you assign the user a license in Exchange Online.
- Start a new migration batch for the user.
- Migration will go through as expected.