Why is it important to control Office 365 Group creation?
This feature is enabled by default. So its better to put restrictions in place or later clean up sites, groups, permissions set by organization users.
Which Group?
SharePoint frequently reuses terms, which often makes conversations and forum posts a lot of fun. Thereâ€ s at least three “Groups†in Office 365:
- Active Directory Groups: Groups at the AD level. Outside of SharePoint. Useable across all site collections, and other applications. A “Sales Managers†AD group can be created once, updated in one place and used across all site collections in the tenant.
- SharePoint Groups: Collections of users (people) and AD groups. Scoped to a single site collection. A “Sales Managers†SharePoint group would need to be created in each of the site collections and all updates repeated across all of the site collections.
- Office 365 Groups: A new collaboration option! A combination of a mailbox and a site collection. Not a group useable for managing access to SharePoint sites.
Office 365 Groups
Office 365 Groups are a combination of an Exchange email account with the groupâ€s name that is used to store conversations, and a “OneDrive – like†site collection to store files.
A collection of Office 365 Groups facts:
- Internally, to distinguish traditional groups from the new Office 365 Groups, Groups are called “Unified Groupsâ€. Externally they should be called “Office 365 Groupsâ€, not “SharePoint Groupsâ€.
- Creating a Group creates an AD Distribution group, an email address and a “hidden†SharePoint Site Collection. The site collection is not visible in the tenant admin pages. The AD group is not manageable from Azure AD, only from the tenant admin Groups pages. (You can see members in Azure AD, but cannot edit them.)
- Groups can be created from:
- Outlook (OWA).
- A userâ€s OneDrive.
- The “GROUPS†page in the tenant Admin site. Here you can create both “Office 365 Groups†and “security groupsâ€.
- Conversations are stored in Exchange inboxes and files are stored in SharePoint Site Collections.
- Groups are defined and managed in Azure AD. (Which explains why the PowerShell cmdlets for Groups are not in the SharePoint Online cmdlet library.)
- Each user may create up to 250 Groups and can be a member of up to 1,024 Groups. Thereâ€s no limit for number of Groups per tenant.
- Emails can be sent in the name of the group by members. (Requires a PowerShell based change.)
- Groups will not be deleted if the Groupâ€s owner is deleted.
- Groups use a OneDrive for Business site under the covers. (Template: GROUP#0)
- URL for the files site collection looks like a normal team site instead of a OneDrive site:Â https://yourdomain/sites/groupsitename
- If there is a URL conflict, a number is appended to the name: https://yourdomain/sites/groupsitename51
- URL for the mailbox is “guessableâ€: https://outlook.office365.com/owa/#path=/group/yourGroupName@yourDomain.onmicrosoft.com/people
- Groups site collections are not (currently) displayed in the admin Site Collections page. You may discover their existence when you create a new site collection that has the same name as a group site. “The site collection already exists. Please enter a different address.â€
- PowerShell:
- Get-SPOSite does not return Groups site collections, but you can access a Groups site by URL.
- Get-SPOUser does not return users for Groups sites.
- Groups file storage is counted against the tenant quota. Itâ€s not considered to be a personal OneDrive. There is no “user†for the Group OneDrive. The mailbox can store up to 50GB of messages, posts and calendar entries. The SharePoint Site Collection has a max of 1TB.
- Search: There is a search box, but it opens the Search Center in a new window/tab and searches all of SharePoint, not just the Groups file site.
- The document library in the Group site is very much like a OneDrive for Business library. No ribbon, no custom columns, no metadata and no Content Types. The Groups library is very limited:
- Only one library, and itâ€s not customizable.
- Canâ€t check out/in. (I saw this listed as a feature, but itâ€s not in my tenants.)
- Versioning is enabled (Major only)
- Cannot add/delete columns (i.e. use any custom metadata that might be useful to search or eDiscovery.)
- Cannot use workflows.
- Cannot audit security from the browser.
- No branding. Cannot be opened by SharePoint Designer.
- Only one library, and itâ€
- The Site Collection is VERY limited.
- Almost all of the links for site or list maintenance are redirected to the home page.
- There is no Settings page.
- There is no Site Permissions page, so thereâ€s no Site Permissions page or 2nd tier recycle bin.
- You cannot create new lists or libraries.
- Library Sync: The Sync button works with the new OneDrive for Business sync client. So, keep in mind that group members of easily offline all of the content.
- Recycle Bin:
- There is a recycle bin, but you can only access the user level.
- If you share a file with a non-member with “Editâ€, they can delete the file, but get “Sorry, you don’t have access to this page†when they click the Recycle Bin link.
- There is no Site Collection recycle bin page available. The Groups “owner†canâ€t recover files deleted by members.
- Can be administered and reported on from PowerShell as part of the Exchange Online cmdlets.
https://technet.microsoft.com/en-us/library/jj200780(v=exchg.160).aspx
cmdlets: Get/Set/New/Remove-UnifedGroup and Get/Add/Remove-UnifiedGroupLinks
https://support.office.com/en-us/article/Use-PowerShell-to-manage-Office-365-Groups-aeb669aa-1770-4537-9de2-a82ac11b0540 - Groups can be disabled for all users. (PowerShell)
- Groups can be disabled for a subset of users. (Requires PowerShell.)
- Security:
- New groups default to “Publicâ€. Everyone has access. You must remember to choose Private when you create the group.
- I canâ€t find a place to change Public/Private status after the group has been created.
- The names of groups are not private. They will be seen in “Send toâ€, “Share†and other places where user names can be seen. All groups, public and private, are listed in the “Browse Groups†screens. (Train your users not to use group names that reveal confidential data. You know, names like “IT Layoff Planning Groupâ€.
 )
) - Files can be shared with the “groupâ€. They will be listed in the “Shared with us†tab.
- Files that are shared with the “group†will be visible to all users even for Private groups! (I think this is a bug!) (The user must know the URL to the Files site.)
- Files can be “resharedâ€. Sam has a site named “My Private Groupâ€, which is Private, He shares a file with Robert (with Edit or View). Robert can only see that one file in the group site. Robert shares with Susan. Susan can then share with………
- Users who guess the URL to the file site can see the site, but no files, or only files shared with them. They can see the list of “members†and who the owner is.
Groups vs. Team Sites
| Groups | Team Sites | |
| Can add lists/libraries | No | Yes |
| Can add pages | No | Yes |
| Can add columns/metadata | No | Yes |
| Can use Content Types | No | Yes |
| Can hide membership | No | Yes |
| Can brand | No | Yes |
| Can be fully managed with PowerShell | No | Yes |
Cleaning up the mess
So since this feature is enabled by default. Users in your organization may have already started creating groups and hidden SharePoint site.
So first we need to disable this option right away.
Prerequisites:
- The 64-bit version of the Microsoft Online Services Sign-in Assistant: Microsoft Online Services Sign-in Assistant for IT Professionals RTW.
- The 64-bit version of the Windows Azure Active Directory Module for Windows PowerShell Preview.[su_note note_color=”#fafae8″]IMPORTANT: Make sure that you install version 1.1.130.0 of Microsoft Azure Active Directory Module for Windows PowerShell Preview so that you have the functionality to run the required cmdlets. Note that this is the Preview version.[/su_note]
Check your Company-level configuration settings
Now need to check your company-wide configuration settings through the Get-MsolCompanyInfo Windows PowerShell cmdlet. This cmdlet will display your current company-wide configuration settings that affect all users. You specifically need to verify that the UserPermissionToCreateGroupsEnabled parameter is set to False.
To check your Company-level configuration settings
You will first need to connect to your Office 365 service. In the Windows Azure Active Directory Module for Windows PowerShell, type and enter the following:
Connect-MsolService
In the Sign in to your Account screen, enter your credentials to connect you to your service, and click Sign in.
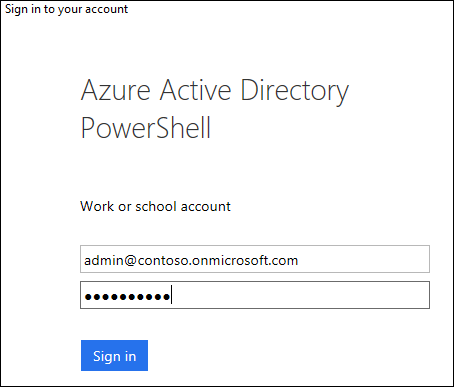
You will be returned to a prompt in the Windows Azure Active Directory Module.
You will need to display your company-wide configuration settings. To do this, type and enter:
Get-MsolCompanyInformation
This will display a listing of the current configuration settings that apply to all users in your company.
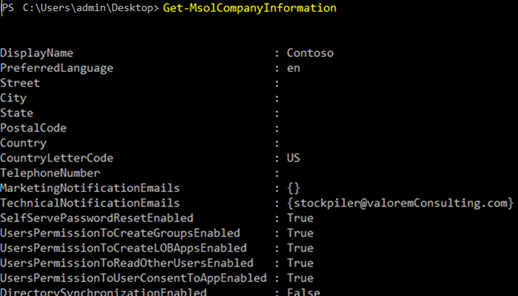
As you can see the value for the UsersPermissiontoCreateGroupsEnabled setting is True. We need to change this to False.
To change the UsersPermissionToCreateGroupsEnabled setting value
You will first need to use the Set-MsolCompanySettings cmdlet to change the UsersPermissionToCreateGroupsEnabled parameter to False. In the Windows Azure Active Directory Module for Windows PowerShell, type and enter the following:
Set-MsolCompanySettings - UsersPermissionToCreateGroupsEnabled $False
You will be returned to a prompt in the Windows Azure Active Directory Module.
After changing the setting, you then need to run the Get-MsolCompanyInfo cmdlet to verify that the value has changed to True.
Get-MsolCompanyInfo
After running the cmdlet, check the displayed information to verify that the UsersPermissionToCreateGroupsEnabled setting value has changed to False.
Identifying the site collections in PowerShell
Connect to SharePoint
#Connecting to SharePoint

#User account with Global Admin Permissions
$adminUPN="[email protected]"

#Organization Name (myorganizationinc.onmicrosoft.com)
$orgName="myorganizationinc"

#Prompting and using the password
$userCredential = Get-Credential -UserName $adminUPN -Message "Type the password."

#Making the Connection
Connect-SPOService -Url https://$orgName-admin.sharepoint.com -Credential $userCredential
Get a list of Site Collections
Get-SPOSite -Detailed | Format-Table -AutoSize
More than likely the Group SharePoint Site is restricted to the user that may have created it. You may get this error when trying to remove it:

To remove it you need to take ownership as the CollectionOwner
Set-SPOUser -Site http://myorganizationinc.sharepoint.com/sites/<YourGroupsSite> -LoginName [email protected] -IsSiteCollectionOwner $true
Now if you want to do this for all the site collections:
$Sites = Get-SPOSite
ForEach ($Site in $Sites)
{
Set-SPOUser -Site $site -LoginName [email protected] -IsSiteCollectionOwner $true
}
Once this is applied the admin will be able to remove the hidden Sharepoint collection. Remove the site collections that are no longer needed.
Remove-SPOSite -Identity https://myorganizationinc.sharepoint.com/sites/<YourGroupsSite> -NoWait
Deleting the Groups
Now to delete the groups that the users created. Head over to the Office365 Admin Portal.
Click the “Office 365 group” from the selection to show all groups (These should be all cloud based)
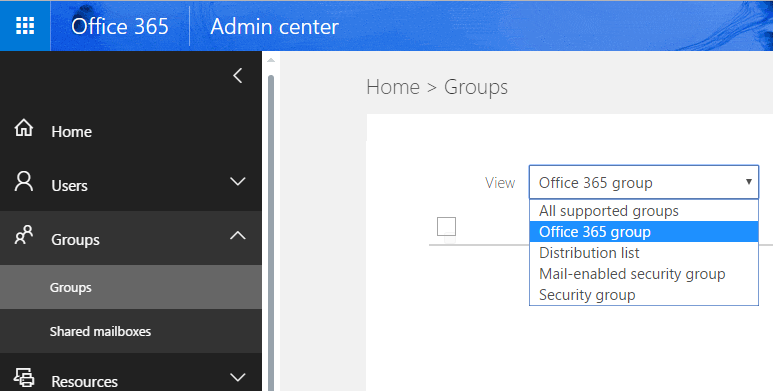
Once the groups are displayed remove them as necessary.
Groups are no longer in your environment.
Planning for the future: Migration of Distribution Groups to Groups
If you are in Hybrid mode you cannot user Groups in a clean fashion. It will get messy. Sooner or later you will need to plan for migration of your distribution groups to Groups. Know your current limitations and hold.
Migrate distribution lists to Office 365 Groups – Admin help
Distribution list eligibility for migration
The following table lists which distribution lists are eligible or not eligible for migration
| Property | Eligibility |
| On-premise managed distribution list. | Not eligible |
| Nested distribution lists. Distribution list either has child groups or is a member of another group. | Not eligible |
| Moderated distribution list | Not eligible |
| Distribution lists with send on behalf settings | Not eligible |
| Distribution lists hidden from address lists | Not eligible |
| Distribution lists with member RecipientTypeDetails other than UserMailbox, SharedMailbox, TeamMailbox, MailUser | Not eligible |
| Distribution lists with member join or depart restriction as Closed | Eligible. Converted to a private Office 365 Group. |
| Distribution lists with custom delivery status notifications. ReportToManager = true, ReportToOriginator = false ReportToManager = false, ReportToOriginator = false | Eligible. Office 365 groups don’t understand these properties, and delivery status notifications are always sent to the person that sent the email. |
Create a Batch file or Powershell script and add it to scheduled task.
[su_tooltip position=”north” content=”Hereâ€s what all of those funky switches do. The first two arguments are for the InstallShield application, setup.exe. /S requests a silent installer, and /v lets the application know that youâ€re going to pass switches directly to the MSI. This is why the command structure after the /v is enclosed in double quotes. The /qn portion is MSI-speak for no user interface, while the REBOOT=R portion is toReallySupress the reboot. ADDLOCAL is describing what features to install locally, while REMOVE states to toss out the HGFS (Shared Folders) feature. This way ensures that new features will be added without having to call them all out in a list.”]Please check permissions on the files and folders. If you have unique or specialized permission on the file or folders these wont work.[/su_tooltip]
Batch File:
@echo off
:: set folder path
set dump_path=c:\shares\dump

:: set min age of files and folders to delete
set max_days=7

:: remove files from %dump_path%
forfiles -p %dump_path% -m *.* -d -%max_days% -c "cmd  /c del /q @path"

:: remove sub directories from %dump_path%
forfiles -p %dump_path% -d -%max_days% -c "cmd /c IF @isdir == TRUE rd /S /Q @path"
Powershell:
# set folder path
$dump_path = "C:\shares\dump"

# set min age of files
$max_days = "-7"

# get the current date
$curr_date = Get-Date

# determine how far back we go based on current date
$del_date = $curr_date.AddDays($max_days)

# delete the files
Get-ChildItem $dump_path -Recurse | Where-Object { $_.LastWriteTime -lt $del_date } | Remove-Item
]]>