I will be discussing two approaches below to connect to a domain controller:
- Connecting from a client machine on the same domain
- Connecting from a client machine on a different domain or a workstation/server
Before we get started, and regardless of which approach you take below, the following will need to be installed on the client Windows machine. Primarily you need to get the Active Directory Module for Windows PowerShell installed.
Installing the Active Directory Module
GUI:
The Active Directory for Windows PowerShell is already built-in into Windows Server operating systems (starting from Windows Server 2008 R2), but it is not enabled by default.
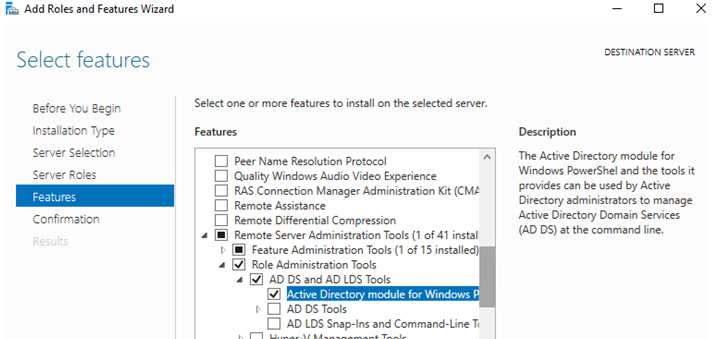
On Windows Server 2016, you can install the AD for PowerShell module from the Server Manager (Add Roles and Features -> Features -> Remote Server Administration Tools -> Role Administration Tools -> AD DS and AD LDS Tools -> Active Directory module for Windows PowerShell).
PowerShell:
You can also install the module from the PowerShell console using the command:
Install-WindowsFeature -Name "RSAT-AD-PowerShell" –IncludeAllSubFeature
The RSAT-AD-PowerShell can be installed not only on the domain controllers, but also on any domain member server or even a workstation. The PowerShell Active Directory Module is installed automatically when you deploying the Active Directory Domain Services (AD DS) role (when promoting server to AD domain controller).

Approach 1: Connecting from a client machine on the same domain
First step you need to do is find all of your domain controllers and allow remote connections to it.
Logon to your one of your domain controllers and open up PowerShell:
winrm quickconfig
[su_note note_color=”#fafae8″]You need to do this once on each domain controller so you can remotely connect to each one of them at a later time.[/su_note]
You can read more about WinRM here.
Alternatively, the following command can be ran in an elevated Powershell console on the DC. This enables WinRM and configures the firewall so that it can accept incoming commands.
Enable-PSRemoting
Once that is done you are ready to connect to your domain controller.
Make sure your system is configured to run PowerShell scripts.
#Set the ExecutionPolicy to allow execution of scripts
Set-ExecutionPolicy Unrestricted
Copy the content below and paste it into your PowerShell Editor. Rename your value of “yourdomaincontroller” to your actual DC Server name.
#ConnectAD.ps1
#Connect to your Domain Controller(DC)
#Change the value after the -ComputerName to your know DC

$session = New-PSSession -ComputerName "yourdomaincontroller" -Credential (Get-Credential)
Invoke-Command $session -Scriptblock { Import-Module ActiveDirectory }
Import-PSSession -Session $session -module ActiveDirectory
Now all command you enter will be applied to the DC.
To check if your connection is successful. Try the command below to get a list of all of your domain controllers.
#Get a list of all domain controllers in your environment
Get-ADDomainController -Filter * | Select-Object name
Approach 2: Connecting from a client machine on a different domain or a workstation
Windows Remoting works perfectly for same domain situations, and the set-up is relatively straight-forward. It’s extremely powerful when it works, and offers a highly flexible way to securely execute commands remotely.
Problems arise however when trying to use WinRM in mixed domain environments, or where only one machine is on a domain. This requires some additional configuration steps outlined below.
Logon to your one of your domain controllers and open up PowerShell and run the following:
Enable-PSRemoting
The following registry key needs to be added to the target domain controllers:
New-ItemProperty -name LocalAccountTokenFilterPolicy -path HKLM:\SOFTWARE\Microsoft\Windows\CurrentVersion\Policies\System -propertyType DWord -value 1
Make sure the ports are open:
By default, WS-Man and PowerShell remoting use port 5985 and 5986 for connections over HTTP and HTTPS, respectively.
The module is interacting with AD through the Active Directory Web Service that must be installed on your domain controller (communication is performed over the TCP port 9389).
[su_note note_color=”#f9f4ca” text_color=”#000000″ radius=”2″]In some environments, you may need to check if the server authentication certs are valid and not expired. Also, in some situations I have seen that if the client is not resolving the FQDN, it is because the DNSzone doesn’t exist in the source domain. Either the zone can be added, or the host file can be modified to add the DC’s FQDN. [/su_note]
Trusted Hosts:
Adding the client IP or name can help avoid errors.
Depending on your environment and what is allowed or not one of the following should work for your situation.
View the computers of TrustedHosts list
To view the list of TrustedHosts added to the machine, type the following command. By default, its value is blank.
Get-Item WSMan:\localhost\Client\TrustedHosts
Add all computers to the TrustedHosts list
Using the Set-Item cmdlet and the wildcard you can add all the computers to the TrustedHosts list with the following command.
Set-Item WSMan:\localhost\Client\TrustedHosts -Value *
Add all domain computers to the TrustedHosts list
In the following command, replace .yourdomain.com with your own domain name.
Set-Item WSMan:\localhost\Client\TrustedHosts *.yourdomain.com
Add specific computers to the TrustedHosts list
You can add specific computers you choose based on their hostname by separating them with a comma (,) using the following command.
Set-Item WSMan:\localhost\Client\TrustedHosts -Value <ComputerName>,[<ComputerName>]
Where ComputerName can be in the Server01 or Server01.yourdomain.com format
Add a computer to an existing list of TrustedHosts
If you have already added some computers to the TrustedHosts list and want to add an additional computer, without deleting the previous entries, you should use the following method. This is because the TrustedHosts list is updated based on the last Set-Item command you have run overwriting the previous entries.
Use the following command to save the current TrustedHosts computer list to a curList variable.
$currentList = (Get-Item WSMan:\localhost\Client\TrustedHosts).value
To add a computer to the current list, type the following command by specifying both the variable you created and the computer name you are going to add.
Set-Item WSMan:\localhost\Client\TrustedHosts -Value "$currentList , Server01"
Alternatively, to avoid using a variable, add the -Concatenate switch to the Set-Item command to add both new and previous entries. For example:
Set-Item WSMan:\localhost\Client\TrustedHosts -Concatenate -Value Server02
Add computers to the TrustedHosts list using the IP address
Similarly to the previous commands, you can use an IPv4 or IPv6 address. In the case of IPv6, you have to type the address between [].
Set-Item WSMan:\localhost\Client\TrustedHosts -Value 10.10.10.1,[0:0:0:0:0:0:0:0]
Add computers to the TrustedHosts list using multiple IP address (Most common)
Set-Item WSMan:\localhost\Client\TrustedHosts -Value "10.10.10.1, 10.10.10.2"
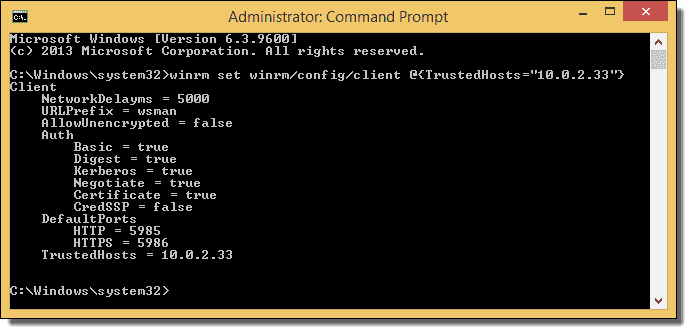
Another way to add trusted hosts is via an elevated Command Prompt:
winrm set winrm/config/client @{TrustedHosts="10.0.2.33"}
Importing the AD Module:
Before using any cmdlets of the Active Directory module, you need to import it to your PowerShell session (on Windows Server 2012 R2/ Windows 8.1 and newer the module is imported automatically).
Import-Module ActiveDirectory
With this configuration, it’s now possible to authenticate and execute a command remotely with explicit credentials.
Lets check if it is working:
Enter-PSSession -ComputerName 10.0.2.33 -Credential $Credentials
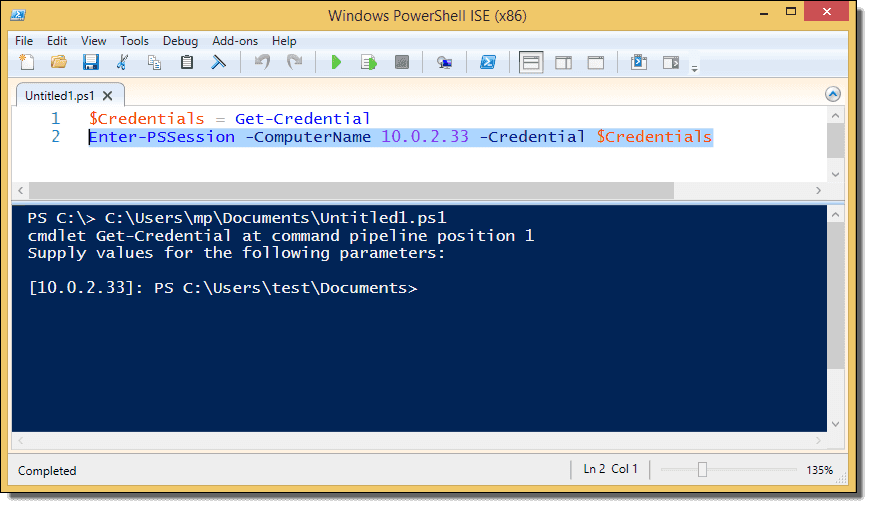
It WORKS! 
Common Errors & Solutions:
Error: WinRM service started. Set-WSManQuickConfig : <f:WSManFault…. WinRM firewall exception will not work since one of the network connection types on this machine is set to Public…… Change the network connection type to either Domain or Private and try again.
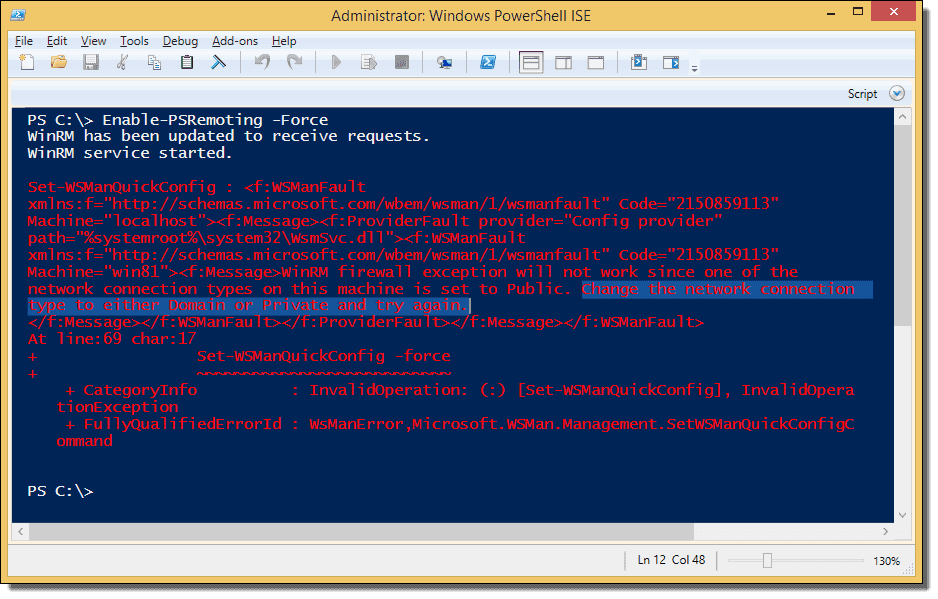
Solution:Â
Enable-PSRemoting -SkipNetworkProfileCheck -Force
Explanation:
The above error message indicates that we have set the network to Public in order to enable PowerShell Remoting. Several ways exist to change the connection type. For some reason that only Microsoft knows, you canâ€ t do this in the Network and Sharing Center.
Error: Enter-PSSession : Connecting to remote server 10.0.2.33 failed with the following error message : The WinRM client cannot process the request….
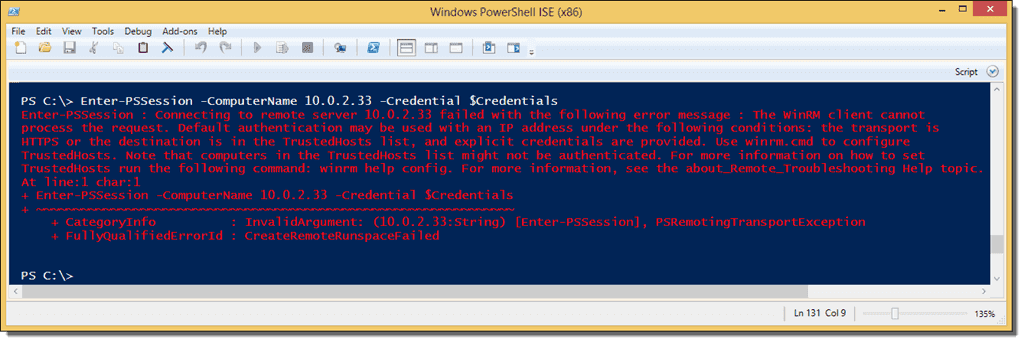
Solution:
winrm set winrm/config/client @{TrustedHosts="10.0.2.33"}
Explanation:
In an Active Directory environment, you can just use the computer name to connect to a remote machine. If you remotely connect to a standalone machine, you usually have to use the IP address instead. If you try to connect to the remote computer with the Enter-PSSession cmdlet using the IP address of the remote machine, PowerShell will throw the above error.
Error:Â Cannot connect to host…
Solution:
Check with your network/ firewall team if the port 5985, 5986, and 9389 are open.
Explanation:Â
Most of the times the ports are overlooked and are the root cause as to why the connection is not working
]]>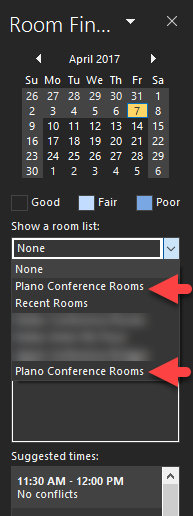
The room list behavior that we see  in Outlook is by design. When we use a Room List  for a meeting, it is stored in the  Most Recently Used entries in the registry. When we create a new meeting, we will see this MRU entry in the top of the Room Lists . The same Room List will be seen again in the drop down which is accessed from the Exchange Server/ Online.
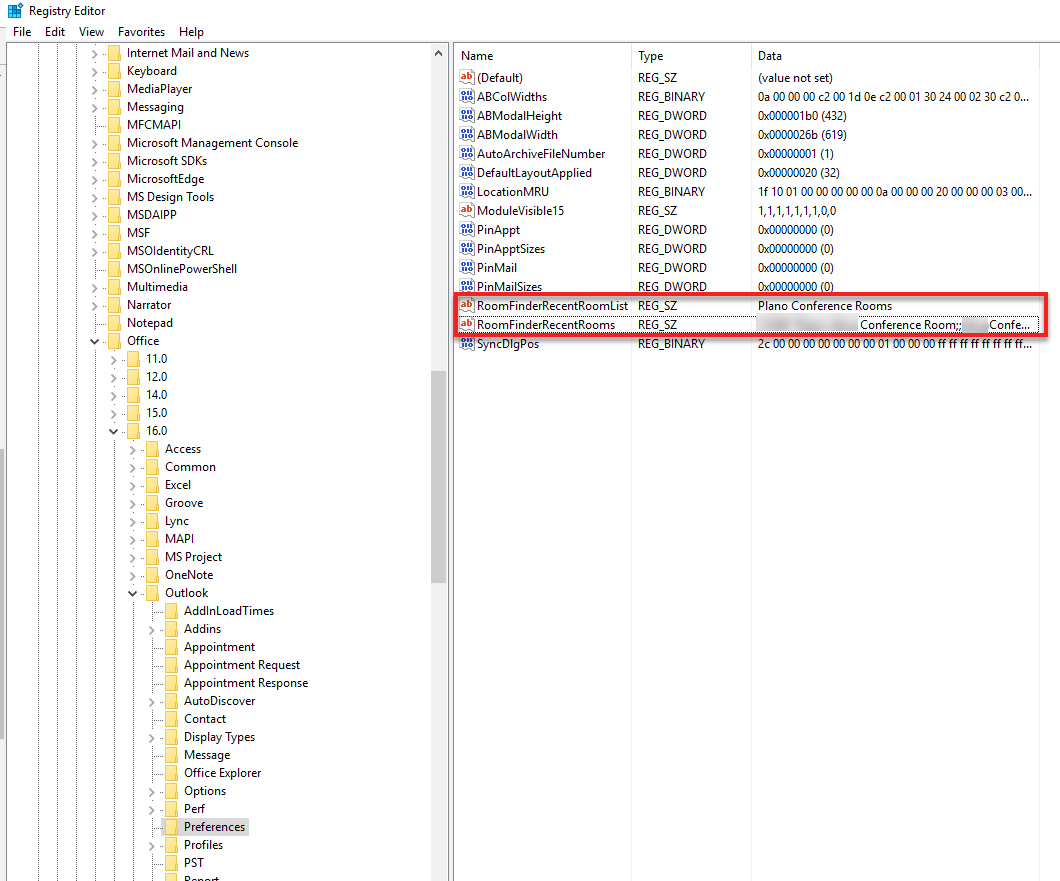
To prevent the duplicate entries seen in the Room List, create the below registry entry with blank data to disable the  Most Recently Used  Room List in Outlook.
Path: HKEY_CURRENT_USER\SOFTWARE\Microsoft\Office\16.0\Outlook\Preferences
Key: RoomFinderRecentRooms
Key: RoomFinderRecentRoomList
If these entry already exist just empty the values.
After Outlook Restart:
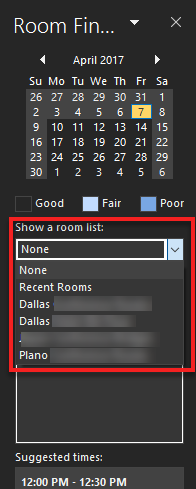
 Only single instance of the rooms list now showing!
In simple terms Room List work as distribution groups for conference or other types of rooms.
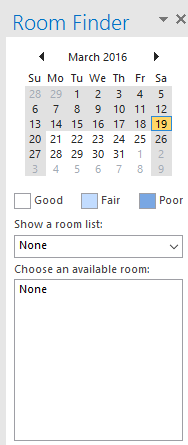
Use PowerShell to login to Office365:
#Connect to Office365
Import-Module MSOnline
$O365Cred = Get-Credential
$O365Session = New-PSSession –ConfigurationName Microsoft.Exchange -ConnectionUri https://ps.outlook.com/powershell -Credential $O365Cred -Authentication Basic -AllowRedirection
Import-PSSession $O365Session
Create a room list:
New-DistributionGroup -Name HQ -DisplayName "HQ" –PrimarySmtpAddress [email protected] –RoomList
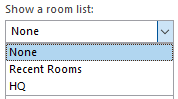
Add rooms to a list:
Add-DistributionGroupMember –Identity "HQ" -Member [email protected]
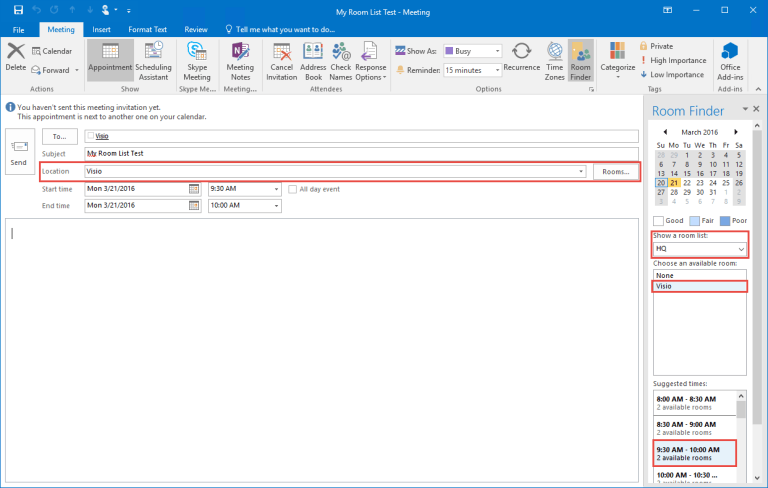
Check what Room Lists you have:
Get-DistributionGroup | Where {$_.RecipientTypeDetails -eq "RoomList"} | Format-Table DisplayName,Identity,PrimarySmtpAddress
Check what conference rooms are part of a particular room list:
Get-DistributionGroupMember –Identity "HQ"]]>
Updating the global address list requires to have the Address List Management role. By default, nobody has this role.
1. Assign the AddressList Management role
- Login with your administrator account to the Office 365 portal.
- Go to Exchange Admin center, Permissions and admin roles.
- Create a new role group and assign the AddressList role.
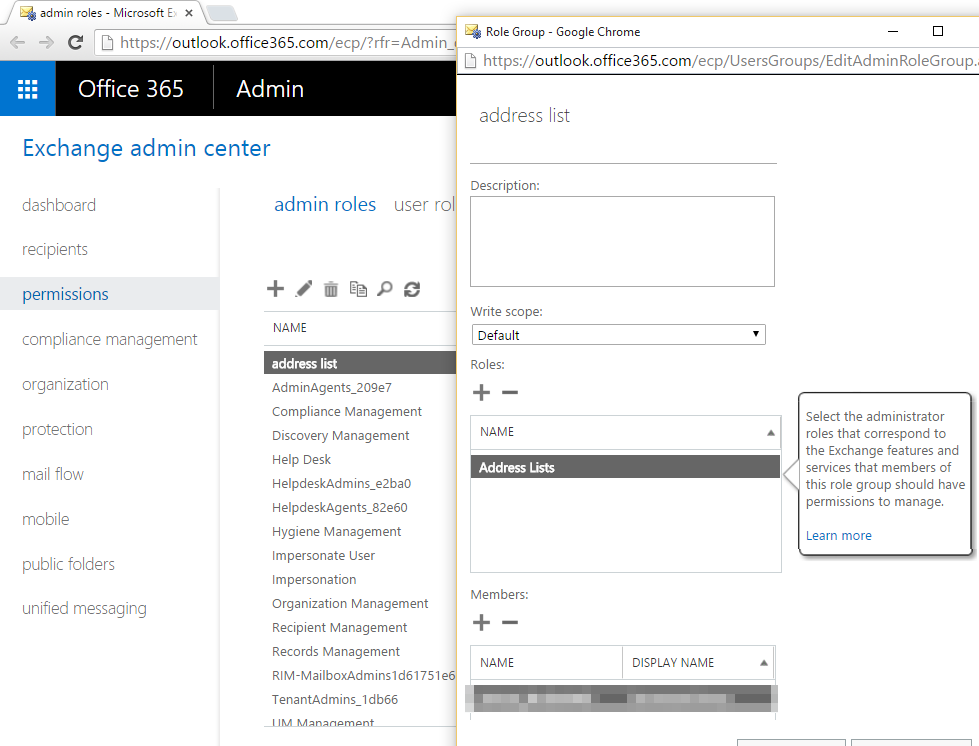
2. Update the AddressList
Once you have the AddressList role assigned, you can use the powershell commands to update the address list. You will have to wait for sometime until the new cmdlets are available.
- First thing, logon to Exchange online using PowerShell.
-
$UserCredential = Get-Credential
$Session = New-PSSession -ConfigurationName Microsoft.Exchange -ConnectionUri https://outlook.office365.com/powershell-liveid/ -Credential $UserCredential -Authentication Basic -AllowRedirection
Import-PSSession $Session
- Run the command Get-AddressList and verify that itâ€s working. (This may take some to work after creating the role)
- RunSet-AddressList -Identity “All usersâ€
- Your address book is now updated
%windir%\system32\inetsrv\appcmd list site > c:\sites.csv