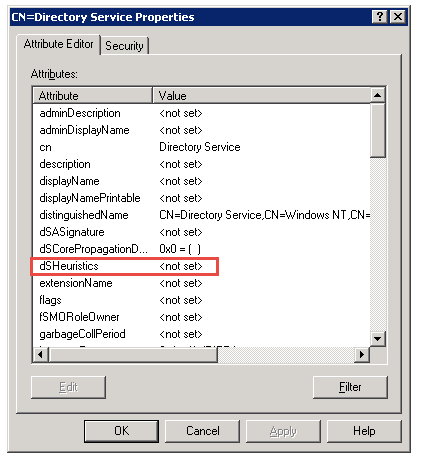
• By default the setting is set to <not set> meaning it is disabled.

    2016-01-15_16-22-51

    I strongly recommend against this. Many applications communicate with directory services through LDAP, but the LDAP Request for Comments (RFC) specification stipulates that an LDAP bind should support the passing of a credential. Connecting anonymously really shouldn’t be needed. You may have many Unix-style applications that currently use an anonymous LDAP bind to other directory services, but there’s a good chance that they do actually support binding through a credential, making anonymous binding unnecessary.

    Where possible, if anonymous binds are required, create a separate AD LDS instance that allows the anonymous connection and has the subset of information that’s required by the application.

    If you have to enable anonymous binds, you can do so.

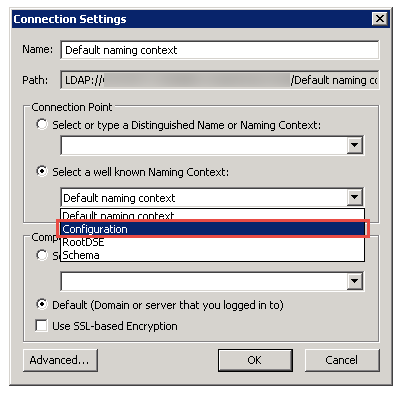
    1. Start Adsiedit.msc (Start, Run, Adsiedit.msc).
      2016-01-15_16-25-34
    2. Expand the Configuration container. Expand Services, Windows NT.
    3. Right-click CN=Directory Service and select Properties.
    4. Double-click the dSHeuristics attribute.
    5. To enable: If the value is currently <Not Set>, set it to 0000002. If it isn’t currently blank, you must change the 7th character of the string to 2. (For example, if it was 001, 0010002 should be your new value. Click OK.
    6. To disable: Set the value to <Not Set>. Click OK.
    7. Close the ADSIEdit tool.

    Anything that NT AUTHORITY\ANONYMOUS LOGON or Everyone has rights to can now be read through an anonymous bind.

  • Note: if you do not know what the “FSMO” roles are, or wish to know more, please see this link:
    Operations master rolesThis is a well-known subject among Active Directory administrators.Even before Windows 2012, there was no lack of choice in the methods allowing us to transfer the FSMO roles:

    If there were only two domain controllers, we could simply demote one with DCPROMO. If the domain controller to be demoted held the FSMO roles, the demotion process would transfer the roles to the other domain controller.

    If there were more than one domain controller, we could transfer the roles with various graphic interfaces…

    Transferring roles with the graphic interface

    We need to use three different “tools” to transfer all the FSMO roles.


    • Active Directory Users and Computers for the PDCe, RID Master and Infrastructure Master roles
    • Active Directory Domains and Trusts for the Domain Naming Master
    • Active Directory Schema – after registering a certain dll…


    We’ll first transfer the PDC emulator, the RID Master and Infrastructure Master in Active Directory Users and Computers (ADUC).

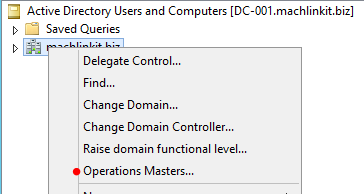
    1. Connect to ADUC, right-click on the domain and select “Operations Masters” in the menu:

    FSMO-010

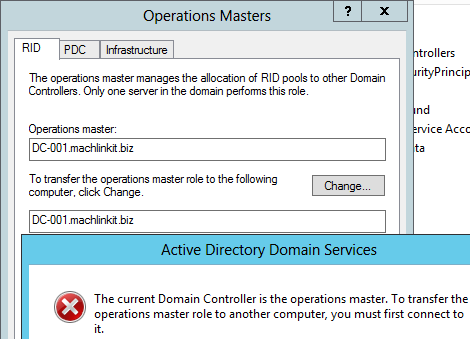
    2. Attempt to change the Operations Master and observe the error message:

    FSMO-01a

    If we happen to be connected to the current role holder, we must first target the domain controller to which the roles will be transferred.

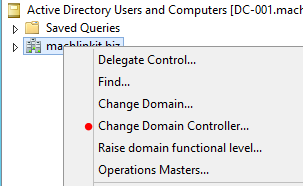
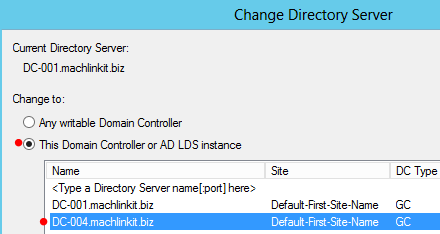
    3. This time, select “Change Domain Controller”:

    FSMO-01b


    4. Connect to the domain controller to which you intend to transfer the roles:

    FSMO-01c

    5. Now go back to the menu (as illustrated above) and select “Operations Masters”.


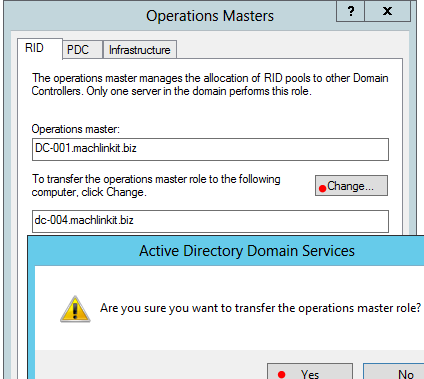
    6. We’ll use the RID Master as an example below. Note that the other domain controller is now the “target” as opposed to the same domain controller. Click on “Change” and confirm. Repeat the same operations for the PDCe and the Infrastructure Master.


    FSMO-01d
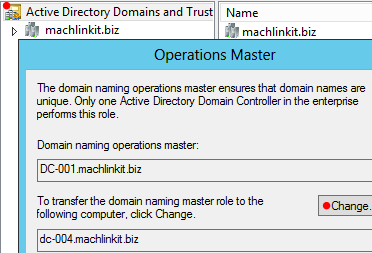
    7. For the Domain Naming Master, we need to perform the same type of operation but in the Active Directory Domains and Trusts MMC.

    FSMO-01e


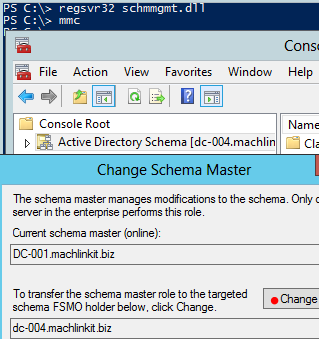
    8. For the Schema Master, we need to register a .dll file and then create add “Active Directory Schema to a Microsoft Management Console (mmc). We then would proceed as we did for the other roles above.

    FSMO-01g

    Note: there should be a confirmation message (which can be closed – not shown above) indicating that the registration was successful. I’ll assume the reader knows how to add “snap-ins” to a MMC. If not, please search for instructions online.

    We can confirm the new owner (or “holder”) of the roles in the graphic interfaces themselves or use the concise “netdom query fsmo” command

    BEFOREPS C:\> netdom query fsmo

    Schema master                 DC-001.machlinkit.biz

    Domain naming master   DC-001.machlinkit.biz

    PDC                                 DC-001.machlinkit.biz

    RID pool manager          DC-001.machlinkit.biz

    Infrastructure master      DC-001.machlinkit.biz

    AFTER

    PS C:\> netdom query fsmo

    Schema master                 DC-004.machlinkit.biz

    Domain naming master   DC-004.machlinkit.biz

    PDC                                DC-004.machlinkit.biz

    RID pool manager         DC-004.machlinkit.biz

    Infrastructure master      DC-004.machlinkit.biz

    Of course, this command could also be used to confirm successful transfers after using the command line to move the roles from one domain controller to another.

    Transferring roles with NTDSUTIL (command line interface)

    We can transfer the roles at the command line using ndtsutil as shown below.

    But first some notes:

    Since Windows Server 2008, we must activate an “instance” of ntds with the command…

    activate instance ntds

    This was not necessary with Windows 2003.

    Second, the syntax for the Domain Naming master has changed.

    With Windows 2003, we would enter:

    transfer domain naming master

    Since Windows 2008, we must enter

    transfer naming master

    Having clarified those points, let’s enter the sequence of commands that transfers the roles (I will double space for readability – the text in bold represents the commands to enter):

    PS C:\> ntdsutil

    C:\Windows\system32\ntdsutil.exe: activate instance ntds

    Active instance set to “ntds”.

    C:\Windows\system32\ntdsutil.exe: roles

    fsmo maintenance: connections

    server connections: connect to server DC-004

    Binding to DC-004 …

    Connected to DC-004 using credentials of locally logged on user.

    server connections: quit

    Note: at this point, depending on the role we want to transfer, we enter all or any of the following:

    fsmo maintenance: transfer schema master

    fsmo maintenance: transfer naming master

    fsmo maintenance: transfer rid master

    fsmo maintenance: transfer pdc

    fsmo maintenance: transfer infrastructure master

    Once the command is entered (and Enter is pressed), ntdsutil produces some rather verbose output indicating which domain controller holds which roles. In the case of the Schema Master we would see something like this:

    fsmo maintenance: transfer schema masterServer “DC-004” knows about 5 roles

    Schema – CN=NTDS Settings,CN=DC-004,CN=Servers,CN=Default-First-Site-Name,CN=Sites,CN=Configuration,DC=machlinkit,DC=biz

    Naming Master – CN=NTDS Settings,CN=DC-001,CN=Servers,CN=Default-First-Site-Name,CN=Sites,CN=Configuration,DC=machlinkit,DC=biz

    PDC – CN=NTDS Settings,CN=DC-001,CN=Servers,CN=Default-First-Site-Name,CN=Sites,CN=Configuration,DC=machlinkit,DC=biz

    RID – CN=NTDS Settings,CN=DC-001,CN=Servers,CN=Default-First-Site-Name,CN=Sites,CN=Configuration,DC=machlinkit,DC=biz

    Infrastructure – CN=NTDS Settings,CN=DC-001,CN=Servers,CN=Default-First-Site-Name,CN=Sites,CN=Configuration,DC=machlinkit,DC=biz

    In this case, we can see (if we look carefully) that DC-004 is now the Schema Master but DC-001 still holds the other operations roles.

    Transferring roles with Powershell

    With Powershell version 3 (part of Windows Server 2012)  and version 4 (Windows Server 2012 R2), we can use the “Move-ADDirectoryServerOperationMasterRole” cmdlet to transfer or “move” the operations roles. We can either type the entire name of the role…

    Move-ADDirectoryServerOperationMasterRole -id DC-001 -OperationMasterRole
    PDCEmulator,RIDMaster,InfrastructureMaster,SchemaMaster,DomainNamingMaster

    Or the number that represent the roles:

    • PDCEmulator = 0
    • RIDMaster = 1
    • InfrastructureMaster = 2
    • SchemaMaster = 3
    • DomainNamingMaster = 4

    So if we wanted to transfer all the roles to domain controller DC-001, we would enter this:

    PS C:\>Move-ADDirectoryServerOperationMasterRole -id DC-001 -OperationMasterRole 0,1,2,3,4

    Despite the rather long cmdlet (of which we only need to type the first 8 letters or so, and then tab), the rest of the complete command can be rather concise if we use (and know) the numbers.

    This cmdlet works quite nicely as we can see here.

    At first, DC-004 holds the roles:

    PS C:\> netdom query fsmo

    Schema master                 DC-004.machlinkit.biz
    Domain naming master    DC-004.machlinkit.biz
    PDC                                  DC-004.machlinkit.biz
    RID pool manager            DC-004.machlinkit.biz
    Infrastructure master        DC-004.machlinkit.biz

    We transfer them to DC-001…

    PS C:\> Move-ADDirectoryServerOperationMasterRole -id DC-001 -OperationMasterRole 0,1,2,3,4

    Move Operation Master Role
    Do you want to move role ‘PDCEmulator’ to server ‘DC-001.machlinkit.biz’ ?
    [Y] Yes  [A] Yes to All  [N] No  [L] No to All  [S] Suspend  [?] Help (default is “Y”): A

    We confirm the transfers with…

    PS C:\> netdom query fsmo

    Schema master                  DC-001.machlinkit.biz
    Domain naming master    DC-001.machlinkit.biz
    PDC                                  DC-001.machlinkit.biz
    RID pool manager            DC-001.machlinkit.biz
    Infrastructure master        DC-001.machlinkit.biz

    Move-ADDirectoryServerOperationMasterRole
    Transferring the roles by domain controller demotion

    Lastly, if we only have two domain controllers or have no preference for the new/future FSMO holder, we can demote the current holder and the roles will be transferred to another domain controller automatically. I will not detail the demotion of a domain controller here but this is what netdom query fsmo shows after the process:

    PS C:\> netdom query fsmo

    Schema master                     DC-004.machlinkit.biz
    Domain naming master        DC-004.machlinkit.biz
    PDC                                      DC-004.machlinkit.biz
    RID pool manager                DC-004.machlinkit.biz
    Infrastructure master            DC-004.machlinkit.biz

    So after demoting DC-001, the FSMO roles are automatically transferred to DC-004. No manual intervention was necessary.

    Source: davidmtechblog


  • Came across an interesting issue today where I was unable to remove the printer drivers. I got the message that the printer is in use and therefore cannot delete the drivers.

    Here’s what I did to get the printer:

    1. Goto ‘Services’ under ‘Administrative Tools’, and restart the ‘Printer Spooler Service’.
    2. Click the Start menu and in the search field type ‘printui /s /t2‘ (without the quotes), and then press Enter or click it in the search list.
    3. You should see a dialog box pop up.
    4. Select the appropriate printer driver you are trying to uninstall and click ‘Delete’ or ‘Remove’.
    5. Delete the printer from ‘Devices and Printers’ in Control Panel.

    I have able to remove the corrupted drivers and then install the new drivers successfully.

  • When a Lync 2010/2013 desktop client for Windows signs-in, to minimize the bandwidth consumption the Lync client retrieves a lot of information from cache.  This cached information is stored in the users SIP Profile in a folder named sip_(SipURI of the user) located on a Windows computer in the following folder:

    Lync 2010: %UserProfile%\AppData\Local\Microsoft\Communicator\

    Lync 2013: %UserProfile%\AppData\Local\Microsoft\Office\15.0\Lync

    Skype for Business: %UserProfile%\AppData\Local\Microsoft\Office\16.0\Lync

    If there are any issue with the files in the SIP profile, users might experience issue with Lync client such as:

    • Contacts appear to be offline
    • Unable to search the Global Address List
    • Contacts are missing from the contact list
    • Contacts display Presence Unknown
    • Presence is not displayed in Outlook or SharePoint
    • “User is not SIP enabled” errors
    • “Lync Server is Temporarily Unavailable” errors

    Additionally, it is a good practice to delete the SIP profile when switching to a new Lync platform as connection information can be cached.

    To resolve the issues listed above, use the following guidance to delete the SIP profile for the affected user.  NOTE: Depending on the Windows Explorer settings, the SIP profile folder may be hidden, if you are unable to navigate to the path listed for your version of the Lync client you will need to set Windows Explorer to Show Hidden Files and Directories prior to completing the steps below.

    Deleting the SIP Profile

    1. Close Lync completely by right-clicking the Lync icon in the Windows System Tray and selecting Exit.
    2. Open Windows Explorer and navigate to the folder that corresponds to the Lync client version that is installed
    • Lync 2010: %UserProfile%\AppData\Local\Microsoft\Communicator
    • Lync 2013: %UserProfile%\AppData\Local\Microsoft\Office\15.0\Lync
    • Skype for Business: %UserProfile%\AppData\Local\Microsoft\Office\16.0\Lync
    1. Delete the sip_username directory that matches the sip address of the user experiencing the issues.  This directory will be rebuilt when the Lync client is restarted the next time.
    2. Restart the computer
    3. Restart the Lync client

    The SIP profile folder and cached information will be rebuilt and the issues above should be resolved.

  • One of my CAS Hub servers was acting up and started queuing email. I needed to move the message to another working server while I needed time to troubleshoot what was causing the queuing.

    This is what I had to do.

    On the non working server:

    • Create a Folder on C: called MailsExport
    • Open Exchange Management Shell and type the following:
    $array = @(Get-Message -Queue "QueueName" -ResultSize unlimited)
    $array | ForEach-Object {$i++;Export-Message $_.Identity | AssembleMessage -Path ("c:\MailsExport\"+ $i +".eml")}
    • Mail should start exporting.
    • Once completed Move the *.eml files to the “Exchange Server\V14\TransportRoles\Pickup” folder on the working server.
    • The new server should immediately start processing the messages.
      1. To update, use the command below (2008 and 2012 server compatible)
        w32tm /config /manualpeerlist:"ntp_server" /syncfromflags:manual /reliable:yes /update
        

        change the ntp_server with your source. Check http://tf.nist.gov/tf-cgi/servers.cgi for servers

      2. Restart the time service
        net stop w32time
        net start w32time
      3. Resync the time
        w32tm /resync
      4. Verify your sync status
        w32tm /query /status

    Commands above should be fine if your sources are working correctly and/or your connection is OK (firewall or Microsoft Forefront can be an issue also).

    The commands below can help with troubleshooting

    To list out peers

    w32tm /query /peers

    To list out NTP Sources:

    w32tm /query /source
  • So I came across this error while migrating some accounts from On-Premise Exchange 2010 Server to Exchange Online.

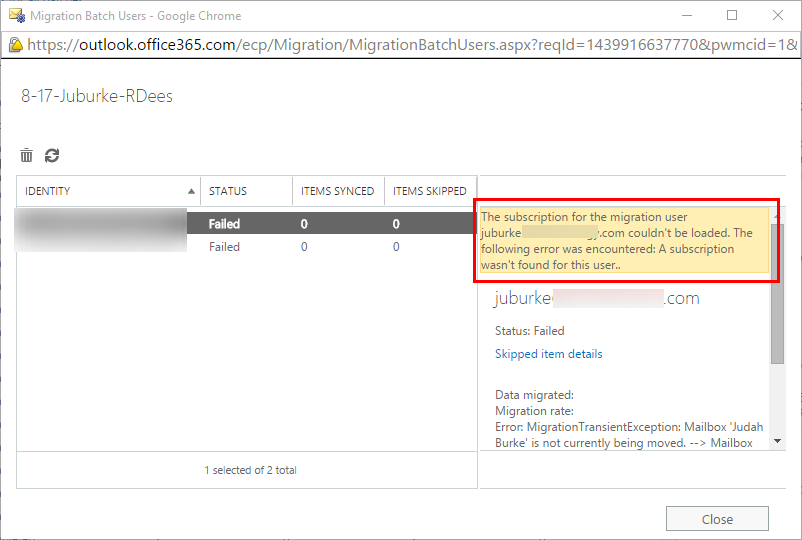
    Error: The subscription for the migration user [email protected] couldn’t be loaded. The following error was encountered: A subscription wasn’t found for this user.

    migrationbatch

    In short, there is an address conflict between the user properties of the exchange server and the synced object on Office365. Lets go back to the basics to get this fixed.

    Environment: Exchange 2010 in Hybrid Mode with Exchange Online. Migrating accounts using a staged migration approach. The problematic user in Exchange Online is properly licensed.

    Setup for Staged Migration.

    • Exchange Online: Stop the problematic migration batch and delete it
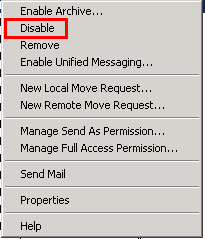
    • Exchange 2010: Even though the user account may show that it is a Remote mailbox or just a User Mailbox. Right click and hit Disable. (This will remove the exchange properties for the user.)
      option1
    •  option2
    • Exchange 2010: Search your Exchange database and find the user’s on-premise mailbox. This is easier if you have just 1 or 2 databases. In an enterprise environment this may be a task by itself. Open EMS and type the following:
      Get-MailboxStatistics -Database <your exchange database name>

      If the result set it too long, you may want to save the contents to a file.

      Get-MailboxStatistics -Database yourexchangedatabase > C:\my_exchange_users.txt

      Open the file and search for the user you disabled in step 2

    • Now you need to delete the problematic user in Exchange Online. Open up PowerShell ISE and type the following:
      Import-Module MSOnline
      $O365Cred = Get-Credential
      $O365Session = New-PSSession –ConfigurationName Microsoft.Exchange -ConnectionUri https://ps.outlook.com/powershell -Credential $O365Cred -Authentication Basic -AllowRedirection
      Import-PSSession $O365Session
      Connect-MsolService –Credential $O365Cred

      After supplying the Global Admin credentials and successfully logging in, do the following:

      Remove-MsolUser -UserPrincipalName [email protected]
      Remove-MsolUser -UserPrincipalName [email protected] -RemoveFromRecycleBin
    • Now the object is not in Exchange 2010 and Exchange Online
    • Attach the user back to Exchange 2010. Open up EMS and type the following:
      Connect-Mailbox -Identity "John Doe" -Database "YourExchangeDatabase" -User "John Doe"
    • The mailbox should show up in Exchange 2010. Make sure that the SMTP address includes: [email protected] address.
    • In a  few minutes DirSync will sync the object back to Exchange Online (This depends on your DirSync time interval)
    • When the user shows up – make sure you assign the user a license in Exchange Online.
    • Start a new migration batch for the user.
    • Migration will go through as expected.
  • No one intends this but it is a problem that sooner or later you will be come across in your system administrator career.

    I’ve see this resolved many different ways, but I like to narrow it down to a particular OU. Depending on your case you may want to clean this across the board in AD.

    Here is command prompt to the rescue:

    dsquery user "OU=Microsoft,DC=Redmond,DC=CORP,DC=LOCAL" -limit 4000 | dsmod user -pwdneverexpires no

    I haven’t tried this, but some have said the following works in Powershell:

    For OU:

    Get-ADUser -Filter {(ObjectClass -eq "user")} -SearchBase "OU=Offices,DC=Contoso,DC=com" | Set-ADUser -PasswordNeverExpires:$FALSE

    For AD:

    Get-ADUser -Filter {(ObjectClass -eq "user")} | Set-ADUser -PasswordNeverExpires:$FALSE
  • I had trouble finding the Quest AD Powershell Cmdlets today. I knew Quest got acquired by Dell but I thought that my favorites would have still worked. Anyways, after a little of digging on the internet i was able to find them. It is now called ActiveRoles Management Shell for Active Directory  Here is the link: ActiveRoles Management Shell for Active Directory

    The following zip includes:

    ActiveRoles Management Shell for Active Directory 32-bit Aug. 27, 2014 1.5.1
    ActiveRoles Management Shell for Active Directory 32-bit – Zip Aug. 27, 2014 1.6.0
    ActiveRoles Management Shell for Active Directory 64-bit Aug. 27, 2014 1.5.1
    ActiveRoles Management Shell for Active Directory 64-bit – Zip Aug. 27, 2014 1.6.0

    Release Notes and User Guides
    ActiveRoles Management Shell for Active Directory – User Help Guide Aug. 27, 2014 1.5
    ActiveRoles Management Shell for Active Directory – Administrator’s Guide Aug. 27, 2014 1.6.0

    Download

  • Depending on how your Windows servers are configured, you may need to disable SSL v3.

    Note that older versions of Internet Explorer may not have the TLS protocol enabled by default. If you disable SSL versions 2.0 and 3.0, the older versions of Internet Explorer will need to enable the TLS protocol before they can connect to your site.

    For a Simpler Way to Disable the SSL v3 Protocol:

    DigiCert is not responsible for any complications or problems if you decide to use this .zip file to disable the SSL v3 protocol on your server.

    1. Log into your server as a user with Administrator privileges.
    2. Download DisableSSL3.zip, extract the .zip file contents, and then double-click DisableSSL3.reg.
    3. In the Registry Editor caution window, click Yes.
    4. Restart server.

    If you prefer to do it yourself, follow the steps in the instruction below.

    Microsoft IIS: How to Disable the SSL v3 Protocol

    1. Open the Registry Editor and run it as administrator.For example, in Windows 2012:
      1. On the Start screen type regedit.exe.
      2. Right-click on regedit.exe and click Run as administrator.
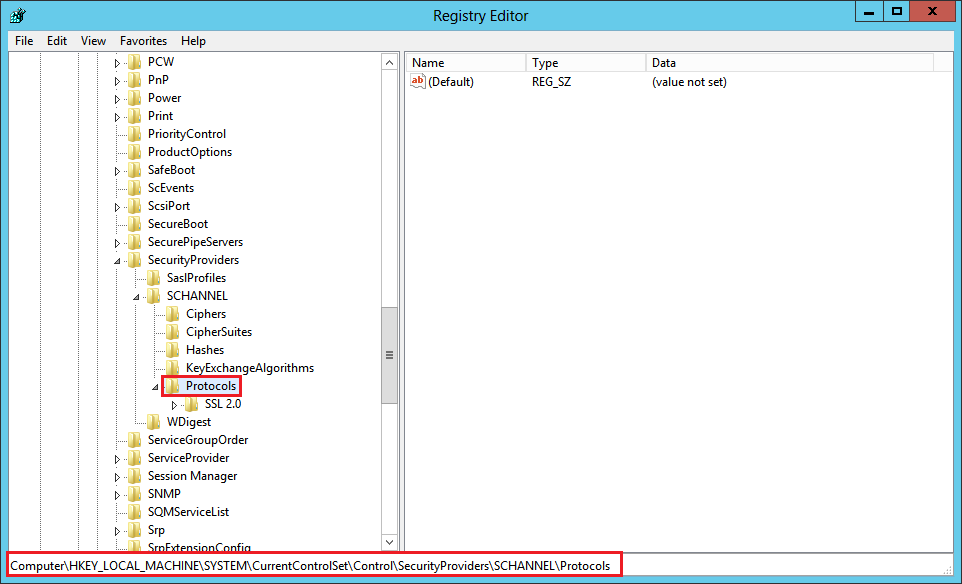
    2. In the Registry Editor window, go to:HKEY_LOCAL_MACHINE\SYSTEM\CurrentControlSet\Control\SecurityProviders\Schannel\Protocols\Windows Registry Key
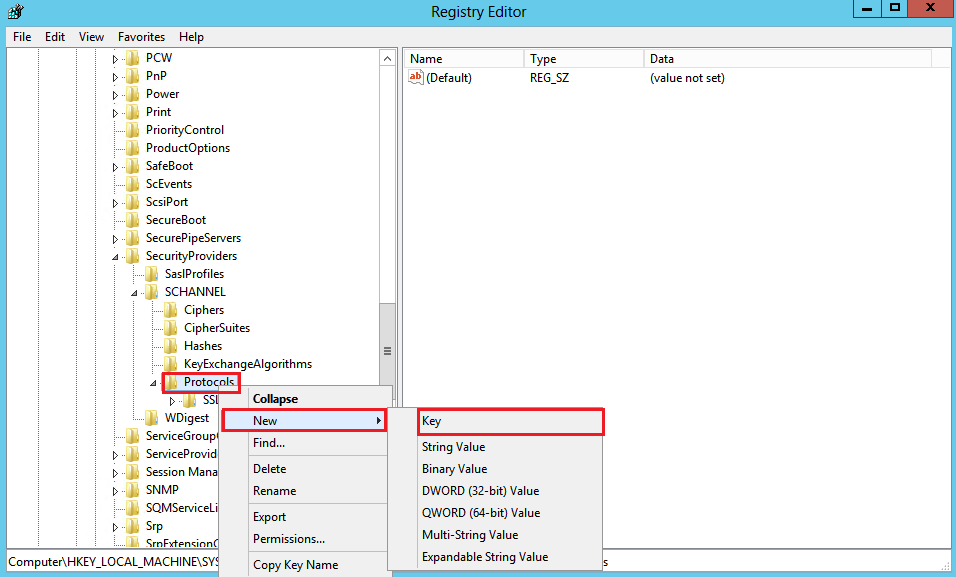
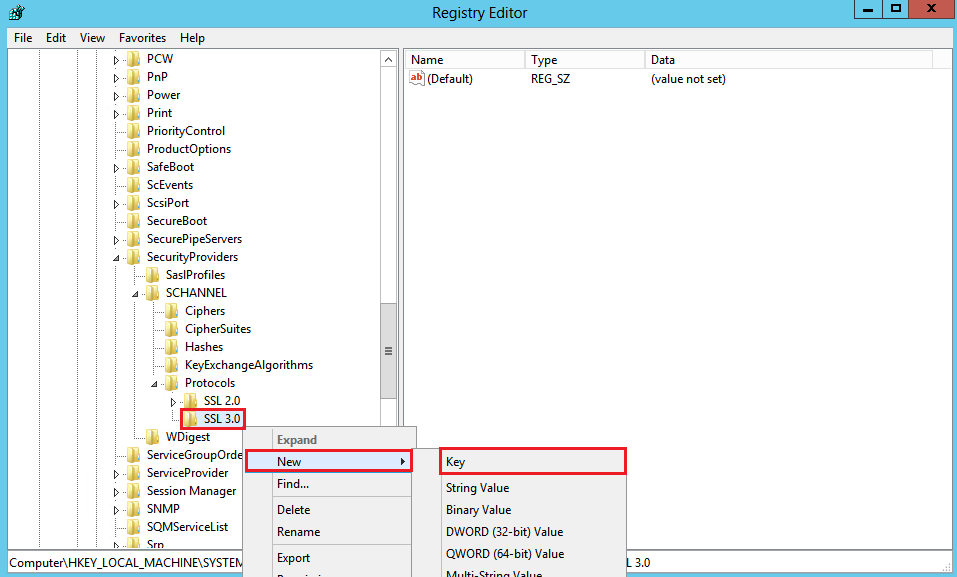
    3. In the navigation tree, right-click on Protocols, and in the pop-up menu, click New > Key.Windows Registry Key
    4. Name the key, SSL 3.0.
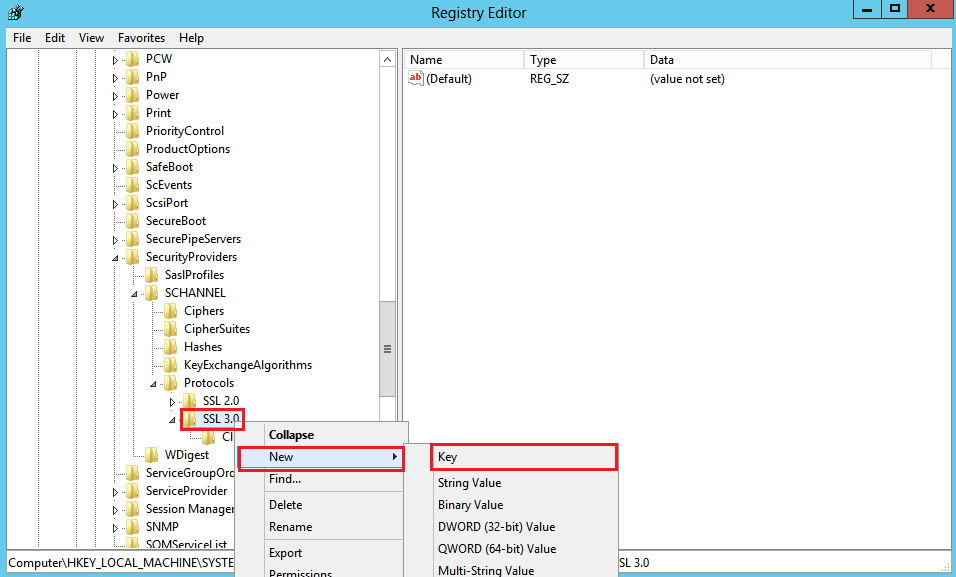
    5. In the navigation tree, right-click on the new SSL 3.0 key that you just created, and in the pop-up menu, click New > Key.Windows Registry Key
    6. Name the key, Client.
    7. In the navigation tree, right-click on the new SSL 3.0 key again, and in the pop-up menu, click New > Key.Windows Registry Key
    8. Name the key, Server.
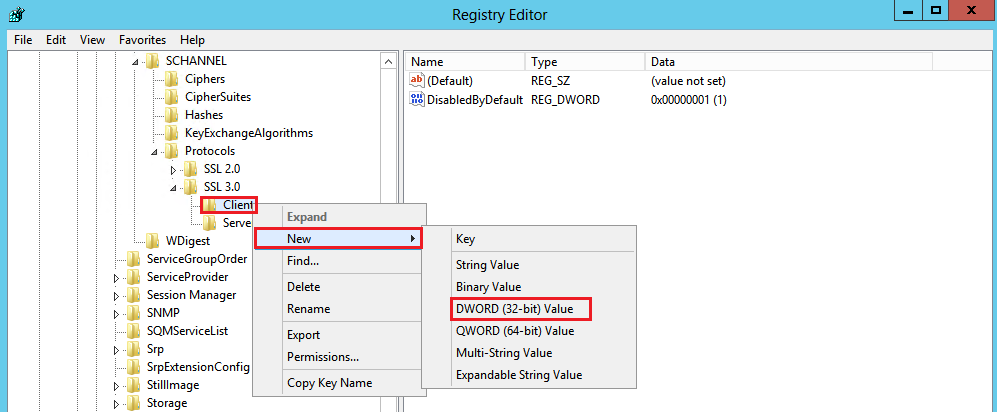
    9. In the navigation tree, under SSL 3.0, right-click on Client, and in the pop-up menu, click New > DWORD (32-bit) Value.Windows Registry Key
    10. Name the value DisabledByDefault.
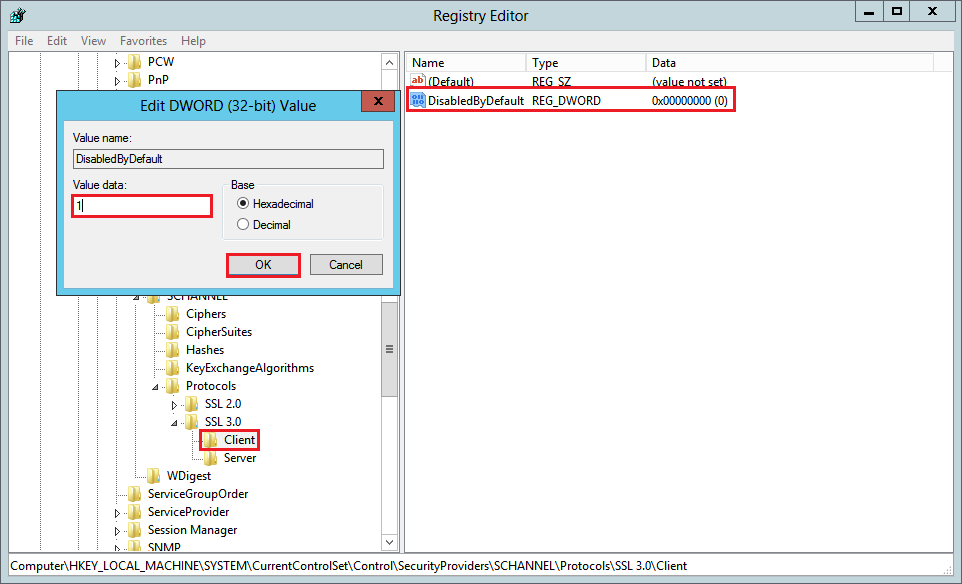
    11. In the navigation tree, under SSL 3.0, select Client and then, in the right pane, double-click the DisabledByDefault DWORD value.Windows Registry Key
    12. In the Edit DWORD (32-bit) Value window, in the Value Data box change the value to 1 and then, click OK.
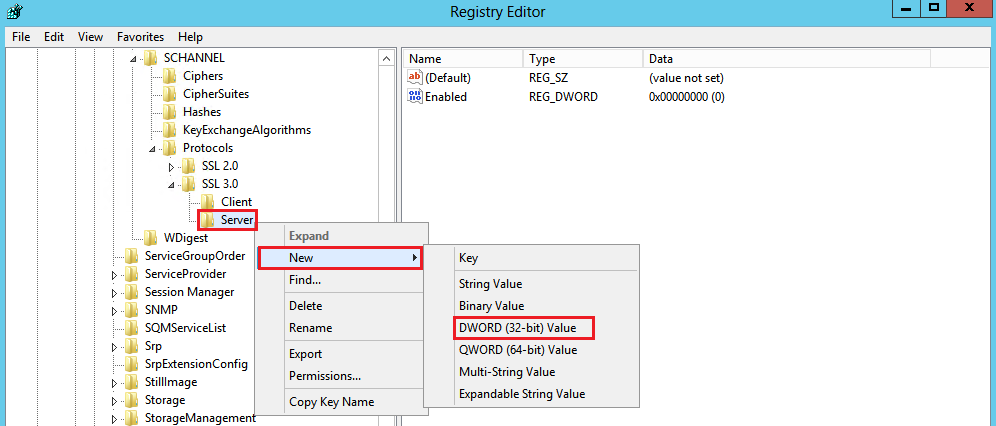
    13. In the navigation tree, under SSL 3.0, right-click on Server, and in the pop-up menu, click New > DWORD (32-bit) Value.Windows Registry Key
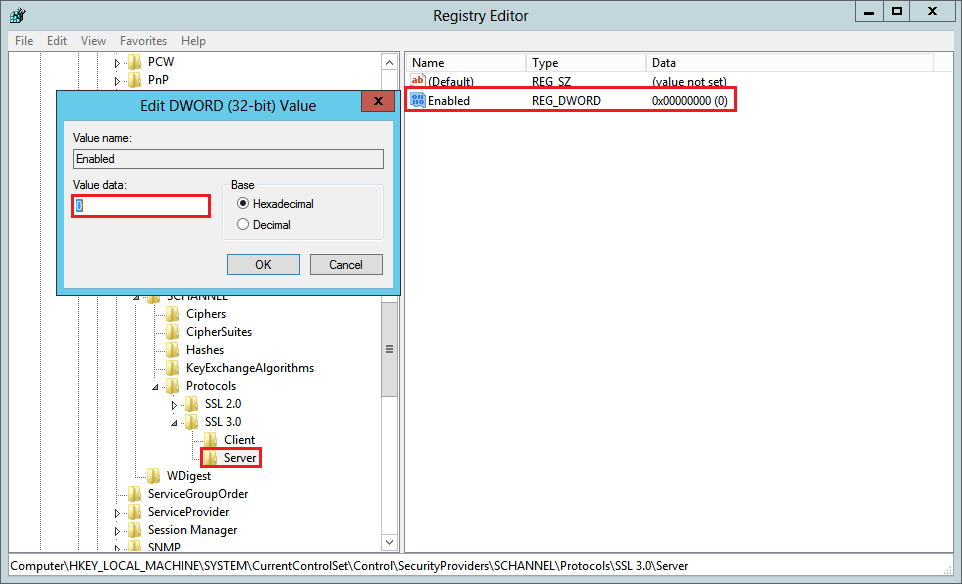
    14. Name the value Enabled.
    15. In the navigation tree, under SSL 3.0, select Server and then, in the right pane, double-click the Enabled DWORD value.Windows Registry Key