• This article applies to Outlook 2007 and 2010. If you are experiencing this issue with other mail clients, please contact Support.

    The “Copy” prefix is usually added to calendar items when items are imported from a PST file or copied from another calendar.

    To avoid this happening move items to the calendar instead of importing:

    1. Open Outlook.
    2. Open the .PST file (one that was imported) as an Outlook Data File.
      File > Open > Outlook Data File (.pst)
    3. Switch to Calendar view and check the boxes next to both calendars to view them side by side.
    4. Right-click and drag the item from the pst file calendar to your current mailbox calendar and select “Move” from the menu.
    5. Repeat for every similar item.

    To get rid of this “Copy” prefix, you can copy the script that is provided below and run it in Outlook. The script will remove the prefix however you could be still unable to edit the calendar items. To run the script that will remove the “Copy” prefix:

    1. In Outlook, select the Calendar.
    2. Press Alt+F11 to open the VBA editor.
    3. Expand Project1, then double-click on ThisOutlookSession to open the code window.
    4. Copy the code below and paste it into the code window, then Save.
    5. Click the Run button.
    Sub RemoveCopy()
    Dim myolApp As Outlook.Application
    Dim calendar As MAPIFolder
    Dim aItem As Object
    
    Set myolApp = CreateObject("Outlook.Application")
    Set calendar = myolApp.ActiveExplorer.CurrentFolder
    
    Dim iItemsUpdated As Integer
    Dim strTemp As String
    
    iItemsUpdated = 0
    For Each aItem In calendar.Items
        If Mid(aItem.Subject, 1, 6) = "Copy: " Then
          strTemp = Mid(aItem.Subject, 7, Len(aItem.Subject) - 6)
          aItem.Subject = strTemp
          iItemsUpdated = iItemsUpdated + 1
        End If
        aItem.Save
    Next aItem
    
    MsgBox iItemsUpdated & " of " & calendar.Items.Count & " Meetings Updated"
    
    End Sub
     

  • $users = Get-ADGroupMember "AD Group with Users to be Enabled for ActiveSync"
    foreach ($line in $users) {
        $user = $line.samaccountname
        Set-CASMailbox $user -ActiveSyncEnabled:$true
        Get-CASMailbox $user | Select-Object Name, ActiveSyncEnabled
    }


  • I have tested this only in a Hybrid environment.

    • Create a Universal AD Security Group called O365_Disabled_ActiveSync_Users.
    • Add all the members to it.
    • Make sure it has an email address that registers in Office365.

    Connect to Office365 via Powershell ISE:

    Import-Module MSOnline
    $O365Cred = Get-Credential
    $O365Session = New-PSSession –ConfigurationName Microsoft.Exchange -ConnectionUri https://ps.outlook.com/powershell -Credential $O365Cred -Authentication Basic -AllowRedirection
    Import-PSSession $O365Session
    Connect-MsolService –Credential $O365Cred

    Copy the following code in a file called DisableActiveSync.ps1 and run in powershell. Add the users in the group will have ActiveSync now disabled.

    #Disable ActiveSync for a group of Users
     
    # Assign all members of the DG to the dynamic array
    $allMembers = Get-DistributionGroupMember -Identity 'O365_Disabled_ActiveSync_Users'
     
     
    # Loop through the array
    foreach ($member in $allMembers) {
     
           # Disable ActiveSync for each member of the array
           $member | Set-CASMailbox –ActiveSyncEnabled $false
          
           # Remove the # sign in front of the Get-CASMailbox statement for status information
           Get-CASMailbox $member.Name | Select-Object Name, ActiveSyncEnabled
    }
  • If you are getting this error you will be getting a black screen and a mouse pointer only. This will be the same even if you login to safe mode or low graphics mode.

    Here is the fix:

    If you have another OS installed in the system (you have a multiboot system):
    1. Log-in to your computer using another OS (You can use Hiren’s Boot CD/DVD or Ubuntu Live Disc).
    2. Locate the root directory of your computer (that disk or partition in which you installed the OS that you can’t open).
    3. Locate and open the “windows” folder.
    4. Locate and open the “system32” folder under that “windows” folder.
    5. Locate and open the “config” folder.
    6. Rename Default to Default.bak, Sam to Sam.bak, Security to Security.bak, Software to Software.bak, and System to System.bak
    7. You will see a folder named “RegBack”. Open it and copy all of its contents to the “config” folder.
    8. Restart the computer and you display should be back.
    9. Update the drivers from Nvidia’s site.
    10. You’re Done!

  • The following command will give full access to the Mailbox database including future mailboxes when they are created. Just change the name of the Mailbox Database to yours and the name to the one you wish to use

    Get-MailboxDatabase -identity “Mailbox Database” | Add-ADPermission -User "Trusted User"-AccessRights GenericAll

    Now access to all mailboxes:

    Get-Mailbox -ResultSize Unlimited -Database "Mailbox Database" | Add-MailboxPermission -User "Trusted User" -AccessRights FullAccess

    For Send As:

    Add-ADPermission -Identity "Mailbox Database" -User "Trusted User" -ExtendedRights Send-As

    For Recieve As:

    Add-ADPermission -Identity "Mailbox Database" -User "Trusted User" -ExtendedRights Receive-As

    In exchange 2010 only you can use this command:

    $organization = Get-OrganizationConfig; $databasesContainer = "CN=Databases,CN=Exchange Administrative Group (FYDIBOHF23SPDLT),CN=Administrative Groups," + $organization.DistinguishedName; $user = Read-Host -Prompt:"Enter UserName to grant permissions"; Add-ADPermission -User:$user -AccessRights ExtendedRight -ExtendedRights Receive-As, Send-As, ms-Exch-Store-Admin -Identity:$databasesContainer;

    Make sure you have OWA enabled for the user to view the mailbox.

  • Applies to Windows 2003

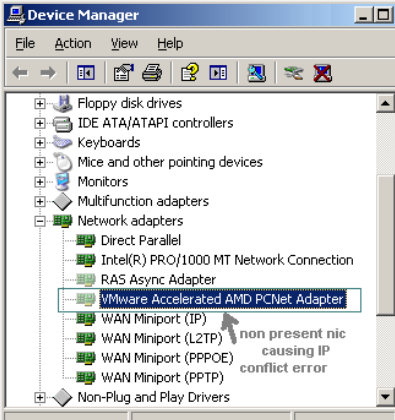
    I was getting this error after have made some change with my virtual NIC adapters. The error I was facing was this one, when I was making changes to the only NIC there was installed:

    The IP address XXX.XXX.XXX.XXX you have entered for this network adapter is already assigned to another adapter Name of adapter. Name of adapter is hidden from the network and Dial-up Connections folder because it is not physically in the computer or is a legacy adapter that is not working. If the same address is assigned to both adapters and they become active, only one of them will use this address. This may result in incorrect system configuration. Do you want to enter a different IP address for this adapter in the list of IP addresses in the advanced dialog box?

    The problem was that I had an old “ghost” NIC with some settings applied to it. The NIC was no longer installed so I was not able to remove or change the settings the normal way. First I tried to find the information in the registry, but there were a lot of entries and it didn’t seem to work. Then I did what I always do in those situations.


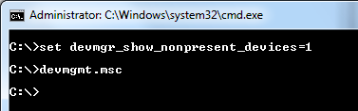
    1. Open a command prompt and enter the commands above.


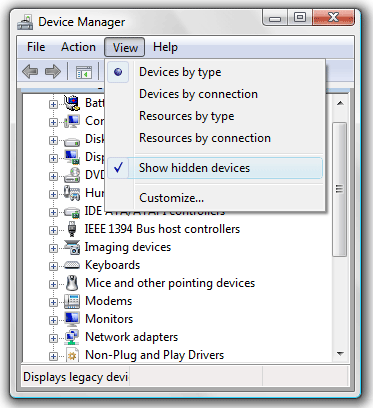
    2. From the view menu select: Show hidden devices


    3. Select the NIC that are removed from the system and right click and chose “Uninstall”
    The NIC that are grayed out are no longer in the system

    After following the above steps I was able to change the IP settings on my NIC without any warning.

  • Trying to open a hyperlink in Microsoft Office Outlook or Microsoft Office Word – you receive the following error message and subsequently cannot open the hyperlinks:
    This operation has been cancelled due to restrictions in effect on this computer.
    Cause: Upgrading Internet Explorer from a previous version or uninstalling Google Chrome can corrupt dependent registry keys.

    Following the simple steps below will help fix the issue:

    Open a Command prompt as Administrator on Windows Vista or Windows 7. Then copy and paste the following info line by line – pressing the enter key on your keyboard to initialize each command:


    REG ADD HKEY_CURRENT_USER\Software\Classes\.htm /ve /d htmlfile /f
    REG ADD HKEY_CURRENT_USER\Software\Classes\.html /ve /d htmlfile /f
    REG ADD HKEY_CURRENT_USER\Software\Classes\.shtml /ve /d htmlfile /f
    REG ADD HKEY_CURRENT_USER\Software\Classes\.xht /ve /d htmlfile /f
    REG ADD HKEY_CURRENT_USER\Software\Classes\.xhtml /ve /d htmlfile /f

    1. Open up command prompt
    2. Type: %windir%\system32\inetsrv\appcmd list site > c:\sites.csv
    3. Open the Sites.csv file in Excel!
  • If we want to check the detail information of the room mailbox schedule or change the permission level of the Calendar permission.  We should do the following steps:

    •  Add a user as a full permission to the room mailbox via PowerShell:

      Assign Permission Add-MailboxPermission -Identity “[email protected]” -User “[email protected]” -AccessRights Fullaccess -InheritanceType All

    • Open room mailbox with OWA
    • Login to user who have the full permission of room mailbox by using OWA.
    • Click on “your alias” at top right corner and select room mailbox
    • When the OWA open room mailbox, we can click on “calendar” -> Share -> “Share this calendar”  and select the share permission. Then, we can select the person and send the announcement email.

    On the Client Side the user will be able to the see the only if they have permissions. If no permissions are assigned it will give a warning saying it is unable to connect. This will go away once the permissions are set right!

    1. Open OWA (Outlook Web apps) by opening http://mail.office365.com
    2. Calendar – > My Calendars  -> open “other Calendars” ,then input the alias of the Room-mailbox

    Microsoft Article: Create A New Room Mailbox