
Security Groups are great for managing large groups for permissions. Â A client requested that they needed to have Read-Only, Read-Write, and Ready-Modify (allow for deleting) for all their file shares for better management.
Getting the Share Names
In order for me to create the groups I needed the share names. PowerShell to the rescue!
Type the following on the File Server/ Cluster to list all the shares and capture the output in a text file:
WmiObject -class Win32_Share -computer <yourfileserver.fqdn) | Out-File c:\scripts\shares.txt
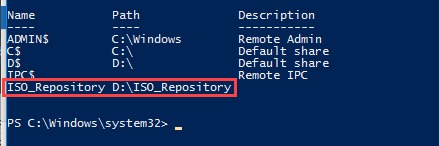
[su_note note_color=”#fafae8″]On your file-server you may have a lot of share but for example purposes I am showing just one.[/su_note]
Output should be similar to:
Cleaning up the Share Names
Now that we have the Share names we need to do a bit of cleanup to avoid having duplicates.
- We need to remove all entries for hidden shares “$”
- We need to remove duplicates
- We need to change the case of the share names to lower case. ( I prefer lowercase but you can decide to do what best fits your needs)
Follow my guide to removing duplicates in a text file using NotePad++
Once the sharenames are clean save it to a text file.
Client Requirement for the Security Groups:
For each file share there are three security groups needed:
- <Sharename>_RO : Read-Only
- <Sharename>_RW : Read & Write
- <Sharename>_RM : Read & Modify
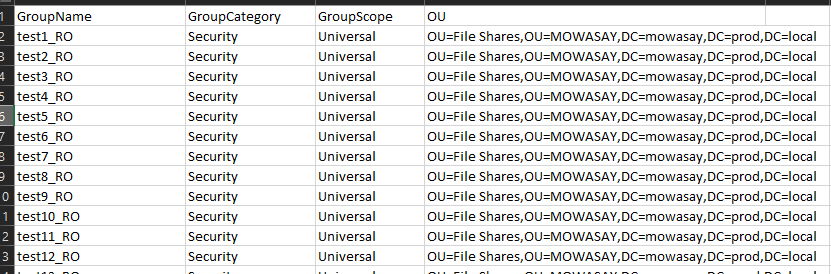
For PowerShell to do this I needed to create a .CSV file with all the security group entries. Now, there are many ways this can be done. I will share what I have been doing.
Open up Microsoft Excel and copy the share on a column to the right (lets say K2)
Now on Cell A2 your value should be =CONCATENATE(K2,”_RW”) and drag it down.
It should look something like this:
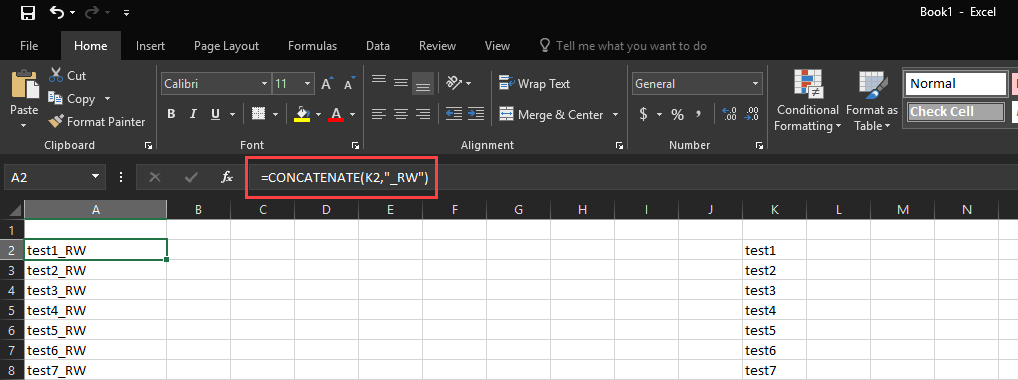
Do the same for RO & RM. Now you have all the security groups names you need to create.
Create a file called FileShares_Groups.csv using the following format.
Create the file Create Security Groups for File Shares.ps1
.NOTES
	File Name:
	Author: Mohammed Wasay
	Contact Info:
		Website:www.mowasay.com
		Twitter:@wasay
	Requires:
	Tested:
.PARAMETER
    None

.EXAMPLE
    .\Create Security Groups for File Shares.ps1
#>
#Import Active Directory Module
Import-Module ActiveDirectory

$csv = Import-Csv -Path "c:\scripts\FileShares_Groups.csv"

ForEach ($item In $csv)
    {
        $create_group = New-ADGroup -Name $item.GroupName -GroupCategory $item.GroupCategory -groupScope $item.GroupScope -Path $item.OU
        Write-Host -ForegroundColor Green "Group $($item.GroupName) created!"
    }
Copy the two files: FileShares_Groups.csv & Create Security Groups for File Shares.ps1 into a folder called C:\scripts on the Domain Controller.
Run the PowerShell script and see the security groups get created.